
In Microsoft 365, assigning admin roles to users is a crucial aspect of managing administrative functions. These roles are designed to align with common business functions and provide individuals with specific permissions to perform tasks within the Microsoft 365 admin centre. Whether you prefer to use the user-friendly interface of the Microsoft 365 admin centre or the power of Windows PowerShell, managing admin roles is a straightforward process.
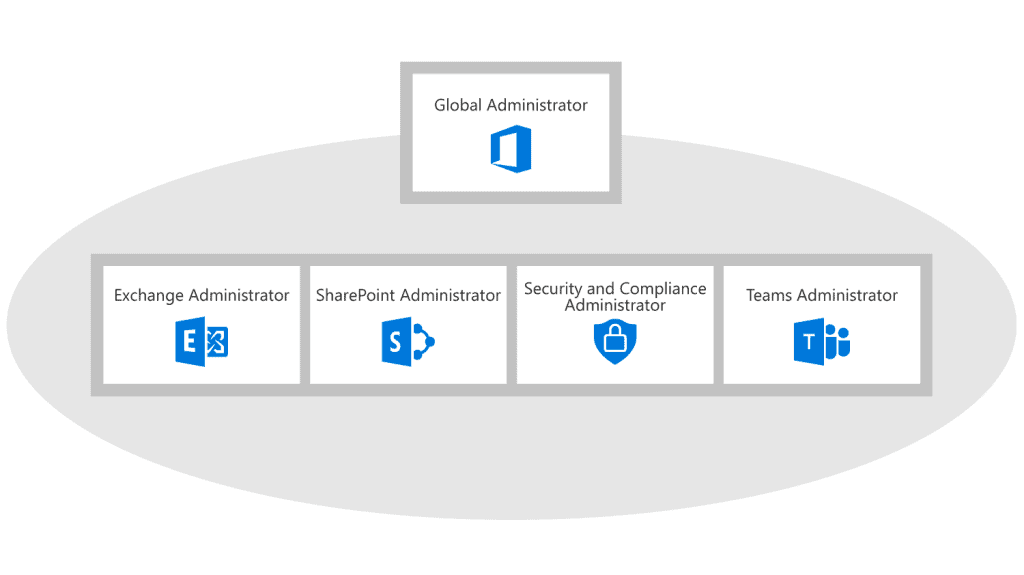
The admin role structure in Microsoft 365 follows a hierarchical approach. Individual service administrators can administer their respective services at the highest level, ensuring granular control and specialization. However, for those who require comprehensive administrative capabilities across all services, the Global admin role encompasses all the service admin roles. This relationship is best illustrated in the following diagram, highlighting the interconnectedness of the various admin roles in Microsoft 365.
By assigning admin roles to users, organizations can effectively distribute administrative responsibilities and ensure that individuals have the necessary permissions to perform their designated tasks. Whether it’s managing user accounts, configuring security settings, or overseeing compliance, the flexibility of admin roles in Microsoft 365 empowers organizations to tailor access levels and streamline administrative processes.
Credit: Microsoft
Assign admin roles in Microsoft 365
Assigning admin roles in Microsoft 365 is crucial in granting users specific administrative functions. These roles are not mutually exclusive and can be combined to provide users with the necessary permissions to perform their duties effectively. For example, a user can be assigned the Exchange admin, SharePoint admin, and User Management admin roles simultaneously.
Admin roles are based on Azure Active Directory (Azure AD) groups. Although these groups are not visible in the Azure AD console, admin roles can be assigned either through the user-friendly interface of the Microsoft 365 admin centre or via the command-line power of Windows PowerShell.
To assign admin roles in the Microsoft 365 admin centre, you need to sign in using a Global admin account and follow these simple steps:
- Navigate to the Admin centre and select Users, then choose Active Users.
- On the Active Users page, select the user whose administrator role you want to modify, which will open the Properties page for that user.
- Next to Roles, click on Edit.
- On the Edit user roles page, you have several options to choose from:
- User (no administrator access)
- Global administrator
- Customized administrator (to view a list of available admin roles)
- Additionally, you can provide an alternative email address in the Alternative email address field. This email address will be used for important notifications, including password resets for admin accounts.
- Once you have made the necessary changes, select Save to close the Edit user roles page.
By following these steps, you can assign admin roles to users in Microsoft 365, granting them the appropriate access and control over specific administrative functions. This fine-grained permission management ensures that users have the necessary tools and responsibilities to effectively carry out their designated tasks within the Microsoft 365 environment.
Assign admin roles in Windows PowerShell
Azure Active Directory PowerShell for Graph (Azure AD PowerShell) is a powerful module commonly utilized by IT professionals to manage Azure Active Directory, including admin role assignments and maintenance. To begin, you need to install the AzureAD module and establish a connection.
When assigning an admin role to a user, there are two essential pieces of information required:
- The object ID of the user.
- The object ID of the role.
Once you have obtained this information, you can utilize the Add-AzureADDirectoryRoleMember cmdlet to assign the user to the admin role. Here’s an example of the PowerShell command:
Add-AzureADDirectoryRoleMember -ObjectID <ObjectID of the role> -RefObjectId <ObjectID of the user>
To retrieve the ObjectID of the user, you can use the Get-AzureADUser cmdlet. For instance, to obtain the ObjectID for a user named Patti Fernandez, you would execute the following command:
Get-AzureADUser -ObjectID "[email protected]"It’s important to note that Azure AD PowerShell only displays “enabled” admin roles. An enabled role is either flagged as enabled (if it has no assigned users) or has at least one active user assignment. To view the enabled roles, you can run the Get-AzureADDirectoryRole cmdlet.
If the desired role appears in the list of enabled roles, you can proceed with adding the enabled role to the user account. However, if the role is not enabled (not listed), you must first enable it before assigning it to a user. Each of these scenarios is covered in the following sections.
By leveraging the capabilities of Azure AD PowerShell, IT professionals can efficiently manage admin role assignments, ensuring that users have the appropriate access and permissions within Azure Active Directory.
Add an enabled admin role to a user
To add an enabled admin role to a user, let’s use an example where we want to assign Patti Fernandez to the Helpdesk Administrator role. Assuming you have obtained the necessary ObjectID values for both the role and the user, you can proceed with the following steps.
Let’s assume the ObjectID for the Helpdesk Administrator role is 729827c3-9c14-49f7-bb1b-9608-f156-bbb8, and the ObjectID for Patti Fernandez’s user account is a4a9ed46-369c-4b69-9e47-d2ac6029485d.
To assign Patti to the Helpdesk Administrator role, you would use the Add-AzureADDirectoryRoleMember command and enter the respective ObjectIDs:
Add-AzureADDirectoryRoleMember -ObjectID 729827c3-9c14-49f7-bb1b-9608-f156-bbb8 -RefObjectId a4a9ed46-369c-4b69-9e47-d2ac6029485d
By executing this command and providing the appropriate ObjectID values, Patti Fernandez will be assigned the Helpdesk Administrator role. This will grant her the necessary permissions and access associated with that role, enabling her to perform Helpdesk Administrator tasks within the Azure Active Directory environment.
Remember to replace the ObjectID values in the command with the actual values obtained for your specific scenario. This approach allows you to easily assign enabled admin roles to users, empowering them to carry out their designated administrative responsibilities effectively.